Hello Again!

It's been a while, but I'm back to taking pictures of in process creations, and answering questions!

Search This Blog

Friday, March 27, 2009

Sun Bleached Shirts

I have had such a great response with my sign up list! And so many of you are still so curious about the sunbleaching that I've decided to do this week on some more details! I just love the results! And this is just the beginning!

Here is "fiesty" in process, and done. As with the sheets of fabric (in my first entry), mix all your colors before, the sun dries things pretty fast and the wetter your fabric is the more the dyes can move and develop, giving more contrast. After submerging the tank top to wet it, i placed an opened plastic grocery bag in between the two layers of fabric to keep the dye from penetrating to the second layer. It creates an interesting 'shadow' effect on the back side if the dye is allowed to go thru, just depends on what you're looking for. I painted on the dye w a 1" foam brush and blended it a bit, the fabric being wet helps w that. Time to place shadow on it: The letters are thick paper from the scrapbooking dept, they absorb a lot of the dye giving a nice contrast when done, and the blue wave design is some poster board i cut out a while back and have used on multiple projects, so although it absorbs it absorbs less, and bc it's been used the paper is more worn and bonds w the fabric making it difficult to remove when dry but leaving some dye behind and giving the mottled effect shown. The most intense contrasts came from crinlking the fabric and squashing it flat, and bc the fabric was very wet a large ammount of the dye made it to the peaks and away from the shadows.

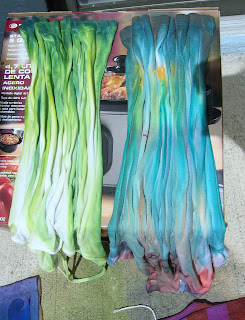
With 'grassy' tank, i put no plastic between the layers, submerged the tank and creased it on a box, which I then propped up at an angle. I then poured the dye onto the high end, in this case the bottom of the tank, one spoonful at a time at varying intervals, rewetting the fabric as i saw a need for more flow of the dye. The back side of the tank was on top, and has the most definition, and the front side of the tank that was on bottom has a 'shadow effect,' which is identical to the back side but not as defined.

On my 'happy' tank top, as with most others, i placed plastic in between the layers of the tank, but when i applied the dye w my foam brush I allowed the fabric to bunch in front of it, creating the line effect. This tank fabric is thin, so it dried faster leaving less contrast under the paper letters. The sun and cloud are from a sheet of plastic stencils. I cut them out to use by themselves. Notice how they leave a very defined edge, while the rice leaves a softer shadow.

'Imagine' is one of my favorites. The word is another cut out from a plastic stencil sheet, the goddess and vine are from some of the pieces I cut out from poster board and have used on many projects, and the small grains are grits. I was esperimenting w diff absorbing agents, and so far have found salt to be the only one to affect the flow of the dye, but the others create nice shadows. The shells are the big difference on this piece. Bc they are 3d they create soft shadows as the sun moves as the shirt dries! I wet this one several times to help this process as it dried, and the act of rewetting it softened the colors and helped them blend. Later I went back and used fabric markers to embellish and add some detail.

Thursday, March 19, 2009

Status Update

here's a general outline of my shows coming up, all subject to change due to weather, sickness, and vacation type activities, but not often. lol. and here's a pic of my booth last sun (can't see one clothes rack) and of some sunbleaching framed per Sarah Anne's suggestion. ah, new ideas and more stuff to do and haul arround to sale. 'tis the season in FL!:


Lake Eola Farmer's Market, downtown Orlando, 10-4pm: Every Sunday


Sand Lake Farmer's Market, at Sand Lake and I-4 Whole Foods Market, Every Sat. 9-2pm: 3/21, 3/28, 4/4, 4/18


Serendipity Square, by Dandelion Communitea and Misty Forest, 2nd Sat. 9-4: 3/14, 4/11


Alive After Five, Ist Ave Sanford, 5-8ish, 2nd Tues.: 3/12, 4/9, 5/14


Full and New Moon Drum Circles, at Dandelion Communitea & Shine On Yoga, 7-10: 3/10, 3/26


Audobon Community Market, at Stardust Cafe, Every Wed. 5-10pm: (fill in)3/11, 3/18


Mount Dora Art Stroll, Mount Dora, 6-8pm: 4/10


Waterford's Lake Farmer's Market, starting April 18, 8-1pm, I have to decide what Sat. to come here, probably last sat, 4/25


The Florida Market at Vistana, at Sheraton Vistana Resort, every Tues 3-7: 3/17, 3/24, 3/31, 4/7

Monday, March 16, 2009

Sun Bleaching

I have recently discovered a process called sunbleaching, and have been having a blast. It involves a photo sensitive dye, sunlight, water, things to lay on the fabric and absorbing agents like salt and rice, and some time to babysit the items until they dry.


The dye moves thru the wet fabric--so the wetter the fabric the more movement and contrast achieved--until it dries. The dye moves out from under where you have created shadow towards the light, completely the opposite of what 'sunbleaching' brings to mind. This does not create the shirt that got left over your back dash too long.


The picture above was my first, the table I made it on still bears the imprint of the process, which is fine with me, but the concrete out back is going to have to be bleached bc it does not wash out once it has been heat set in the sun all day, so most of my creations have since been laid on plastic bags, grocery bags for one sided shirts and large black garbage bags opened up for long swatches of fabric. It was made by first diluting the dye and in this case I used the colors as they came out of the bottles. Next by wetting the fabric and using a 2" wide foam brush to paint long swatches of color. Then by laying on pieces of thick paper i found in the scrapbooking department at Joann's, and fake fern leaves around the large paisley piece on the left. Where the paper made direct contact w the fabric as it dried the dye moved completely away from the shadows, and where the fern leaves were laying the effect is softer bc they did not make direct contact w the fabric.

As I've promised I will be discussing the processes here, problems and discoveries, as well as tips, and as always if you know more than I do please let me know! My first blunder here was a 'duh'. I achieved the results to the right by painting, then crinkling the fabric and laying a large paper paisley shape for scrapbooking on top. The end process was distorted for the paper shape but spectacular for the crinkling. Bc the fabric was very wet the dye had more time to move to the light and created some very 3d effects. The cloth is laying completley flat here.


This piece of fabric was painted w the dyes, I didn't dilute them as much as with the first batch so the colors are more bold. I started w/ a box of limited dye colors and mixed my own shades and variations. Then I 'pleated' the fabric by carefully folding areas long ways on the fabric, creating shadows, then for extra effect and bc the fabric was thin and starting to dry on the black garbage bag, i brushed over the high points w the khaki green i mixed. The left pic is in process and the right pic is the fabric finished and for sale at the Drum Circle i vend at on full and new moons.


This Piece I got a little more inventive w the colors, applying them w a two inch wide foam brush to save on time. First I painted it, crinkled it, let it partially dry, then straightened it out and crinkled it again to finish drying. You can get a rough idea in the pic below of what it looks like after heat setting w an iron and washing it. The dark colors show up a bit better when it's not being used as a background in my booth at Lake Eola Farmer's Market, every Sun 10-4 in downtown Orlando.


This green fabric has been painted, the yellows and greens blended, then pleated short ways. While the fabric is still very wet i sprinkled large rock salt--here i used ice cream salt--

which causes the liquid to flow and creates the effect shown here.


The fabric below was also salted while wet. This is a very crucial factor in the 'flow' patterns. If the fabric is already starting to dry the patterns will not be as pronounced and you will end up w a solid color.